By Carl Weese
To begin with, take a look at the slideshow. The paragraphs below describe what you see me doing in the pictures. Note that this is not a "darkroom" printing process—it's all done in the light, just as you see me doing in the slideshow.
To make a platinum print, you need to mix a sensitizer solution and coat it on a sheet of paper, dry the paper, expose it with your negative to intense ultraviolet light, then develop, clear, and wash the print.
At every step of the way there are choices and options for chemicals, tools, and working procedures. Probably no two people use exactly the same start-to-finish procedure to make platinum prints. I’m going to describe the specific way I made the pilot or master prints for our print offer. (In the slideshow, the little black gadget you see in my hand in some of the pictures has nothing to do with platinum printing. It’s an IR trigger I’m using to set off the camera to make the slideshow pictures.)
The most important first step in making a platinum print (I’m following convention and using that term even though the prints are actually made mainly of palladium, with a small percentage of platinum) is to begin with a negative suited to the process. Platinum paper is very low in contrast, so it requires a long scale, high contrast negative. There's a misconception that negatives for platinum should be "bulletproof"—overexposed and overdeveloped. Not so. Overexposure is to be avoided because it reduces the potential overall density range of the negative, and results in excessive exposure times for printing. The ideal negative is exposed just enough to register all the shadow detail you are interested in, and developed to a much higher contrast level than would be used for silver printing. A 50% increase in development time is a good starting point. Another approach, which I prefer, is to use a proportionally staining developer like PMK pyro. The stain is an excellent UV blocker so the negative "looks" long scale enough to the platinum paper, but can usually still be printed well in silver and is also scanner-friendly.
Platinum and palladium, "noble metals," are non-reactive, so they are not made directly light sensitive like the compounds used in silver-gelatin emulsions. The Pt/Pd solutions are mixed with an equal amount of ferric oxalate, which is UV light sensitve. To simplify, the process actually makes an iron print, and the fancy metals are carried along for the ride. Then the iron is chemically removed from the paper. For these prints, I use a sensitizer consisting of 20 drops of ferric oxalate, 18 drops of lithium palladium chloride, and two drops of potassium chloroplatinite. (I get my supplies, except paper, from Artcraft Chemicals.) I love the color and tone of a pure palladium print, but the deepest tones can be a little weak. The substitution of those two drops of platinum solution cleans up the blacks and makes a slight but agreeable change in print color.
The number of drops needed depends on the size of the negative and the absorbency of the paper. The next step is to brush the sensitizer onto a sheet of Stonehenge, an excellent all-cotton paper that I use for most of my prints. There are quite a few papers that can be used, though sometimes manufacturers make changes, like adding a lot of buffering, that make a paper no longer workable. It’s important to test before ordering a large quantity. Coating simply requires moving the solution around the paper surface with the brush (glass tubes and other gadgets can also be used) until it is fully and evenly distributed. It takes a couple of minutes for an 8x10 on Stonehenge, but some hard-surfaced papers can take quite a bit longer. Since this is done in ordinary room light, and the paper changes color as the sensitizer is absorbed, you just work to make sure the color is consistent, no dark or light areas, to get a perfect coating.
The coated sheet now needs to be dried. While some workers prefer to expose the coated sheet "bone dry," I find this can result in a weak print with anemic dark values. A significant amount of moisture in the paper fosters a richer end result. However, too much moisture can result in muddy light values, or even damage the negative. Striking a proper balance is the key, and it takes experimenting with the specific paper you use. There are probably as many drying techniques as there are platinum printmakers, and most of the techniques probably work fine. I prefer to print with a fairly high level of moisture in the sheet, and to dry "just enough" rather than get the sheet bone dry and then re-humidify it. The simplest way to do this (for this particular paper) is to set the printing room to a relative humidity level of 60–65% and then just let the coated sheet dry to room conditions, either hanging from a clothesline or, more quickly, in a film drying cabinet with fan but no heat. If I can’t get the room conditions I want, which is frequently the case when teaching a workshop at another facility, I just use a fan or hair dryer (no heat) to dry the sheet "just enough" by feel (you feel the paper, not the coating). That might sound tricky but in fact I find workshop students easily learn to do this consistently after just a couple of tries.
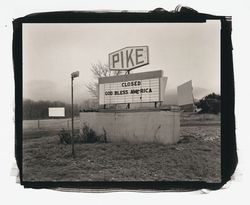
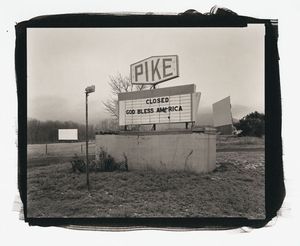
The prepared sheet is then placed in a printing frame in contact with the negative, and exposed to intense UV light. You can go out and expose for several minutes in direct sunlight, and many great prints have been made that way, but it's a lot easier to be consistent with an artificial UV light. "Pike" and "Motel" are both pyro negatives, and print at the same 11-minute exposure time on the smaller of my two UV boxes. That time is typical for a well made pyro neg. "Rock" was developed in Kodak HC-110, with no stain factor, and prints in four minutes—that's typical for non-pyro negs. From a workflow standpoint, I actually prefer the longer exposure time because it gives me time to coat the next sheet of paper.
The darkest parts of the picture form a partial or ghost image during exposure. When printing a negative for the first time, you can inspect the progress of this partial print-out image to help judge when the exposure is complete. There are also a couple of alternate methods of making platinum/palladium prints that print out completely during exposure, requiring no separate chemical development step.
With the method used here, when the exposure is finished, the print needs to be developed. Several different chemicals can be used. The one I prefer is potassium oxalate. The platinum image appears instantly, nearly fully developed, as the developer is poured over the sheet. I then let it stay there for 90 seconds to be sure the development goes to completion. The developer is poured back and the print then gets a five minute water wash. The developer is "immortal." You just keep adding fresh solution to replace the volume absorbed by the paper, and filter it now and then. It can keep going for years, or until somebody knocks the bottle over.
A platinum print has no emulsion, no layers of baryta or gelatin. Once developed, the print consists of finely divided (microscopic) particles of metal embedded directly in the paper fiber. One problem with this is that the print surface, which will eventually be quite robust, is very fragile during wet processing steps. This means you can’t process stacks of prints the way you can with silver-gelatin paper. The prints have to go through the trays one at a time. In practice, during a printing session, as one print is being exposed in the UV box, I'm coating a sheet of paper for the next print, and the previous print is working its way through the wet processing steps.
After the print has been washed for five minutes, it's ready for clearing: we need to get rid of the iron left by the light-sensitive ferric oxalate. There are several ways to do this, the traditional one being weak baths of hydrochloric acid—not my cup of tea. What I use is a first bath of a freshly mixed solution of citric acid in warm water. The print stays there for ten minutes, with occasional agitation. Agitation and timing are not critical the way they are in fixing silver materials. If I'm tied up doing something else when the ten minutes are up, it doesn’t hurt to go longer. I use just enough solution to fully cover the print, and mix fresh solution for each print. The sheet is next rinsed and transferred to a second clearing bath, this time a combination of EDTA disodium (a chelating agent) and that old photographic standby, sodium sulfite. The print finishes clearing in just a couple of minutes in the second bath, but I give it ten as a safety factor.
Now all that remains is to rinse the clearing solution out of the paper, which is done by washing for ten minutes with frequent water changes. Then I hang the print from a line to drain and finally transfer it to clean fiberglass drying screens. A fairly heavy paper like Stonehenge naturally air dries in a few hours and comes out perfectly flat because there is no emulsion to cause curling.
Carl
Send this post to a friend
Note: Links in this post may be to our affiliates; sales through affiliate links may benefit this site. More...
Original contents copyright 2010 by Michael C. Johnston and/or the bylined author. All Rights Reserved.
Featured Comment by
Nikhil Ramkarran: "You know, it occurred to me this morning that this offer covers a number of firsts for me which may be as important as being my first Pt/Pd print. It is also my first contact print, first print produced from a non-electronic camera, and first print from a large format camera/negative. As important as it being my first Pt/Pd print is, I think it is just as important for any of the others firsts. So my original 'thank you' should be multiplied at least by three."