By Carl Weese
One of the really positive things about digital capture is that in a situation where you'd like to shoot freely, digital "free film" lets you shoot with downright reckless abandon. (Of course capture isn't completely free: memory cards cost money even though you get to reuse them, and you need to store multiple copies of your capture files, preferably on more than one kind of media, but that's still almost free compared to film and processing.) Not all situations call for high volume shooting, and it is possible to overshoot. Working too quickly, making too many captures without thinking clearly about them can result in getting everything except the right shot. But there are plenty of times when there are many things to photograph and more than one worthwhile viewpoint or moment for each, so the card starts to fill up with a lot of captures. This can become quite a headache once all those pictures are downloaded to the computer.
The trouble with a dense forest of captures is how to find the best trees. There's also the issue of "what was I really trying to do with this shoot?" That question may not apply to conceptual artists who start with an idea and set up a shot for the camera, but for any photographer who likes to work by going out into the world just looking for the unexpected, the unedited take can be completely confusing. The whole collection is overwhelming so the trick is to slice it into manageable chunks. The chunks I look for are "Situations" (the word "Subjects" might seem more descriptive for someone else's work but I'll coin the Situation usage here). A weekend excursion to an interesting city, or a road trip, or a wedding or a soccer game—just about any shoot that results in a large number of pictures can be divided into Situations.
To illustrate my approach to editing large sets of pictures I'll show screen grabs from the Bridge module of Photoshop CS3 because that's the browser I use. You can find equivalent tools in other browsers and adapt my suggestions accordingly. I'll show the folder holding my shoot from a day spent at a country fair a few weeks ago. In Bridge, I set up a Workspace that has some housekeeping panels on the left, a large pane with twenty good size thumbnails on the right, and a Preview pane in the middle. The selected thumbnail shows at a more legible size in the Preview pane.
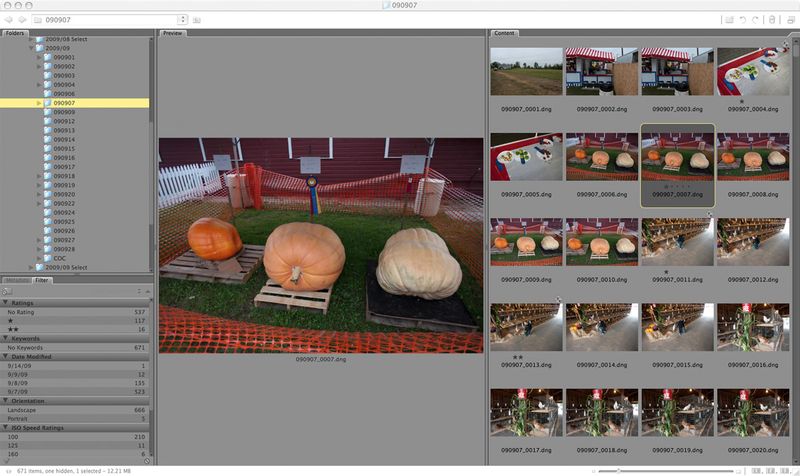
First I want to get a general feel for the shoot, so I scan through the whole folder by selecting a thumbnail in the top row and then using the keyboard down arrow to advance, which means I see every fourth frame I've shot. That way I'll probably see at least one capture from each Situation I worked on. I'll move sideways if needed to catch situations that have only one or two shots, but the idea is a rapid overview of the whole folder at Preview size.
Next step is to start over again at the beginning. In the first screen grab there are five frames of "the giant pumpkin Situation," frames 6–10. Frames 11–15 are of "the poultry barn Situation." I use the right/left arrows to flip through each set quickly, first to last, then last to first, like a rapid back and forth slide show, all the while staring at the Preview window. Don't use the mouse to select the thumbnails or you'll have to keep looking away from the Preview pane. I'm not trying to do a detail-oriented analysis here but to get a gestalt impression of this slice of the shoot. Often one shot just stands out as best, so I "rate" it with a single star (Bridge allows five rating levels, 0-4). Sometimes two or three are in really close contention so I mark more than one. If I don't really like any of them I still find the least unsuccessful shot and give it a star, so the Situation itself remains in the tentative edit. I work all the way through the shoot, not necessarily in one session! When you find it hard to pick the best shots, or to see where the Situations should be divided, go do something else for a while.
(As an aside, if you can find the discipline, put off this whole process for a while after making the pictures. The great Josef Sudek said he didn't look at his pictures until at least six months after shooting them, because he wanted to encounter just the picture, not his memory of the situation he made it in. Deadlines are one of the negative things about professional photography, a bug, not a feature, so if you have the luxury of waiting, take advantage of it.)
Once I've gotten all the way through the folder, I filter for the single-star pictures, and Bridge hides all the rest. I'm not deleting anything, just hiding the potential out-takes.
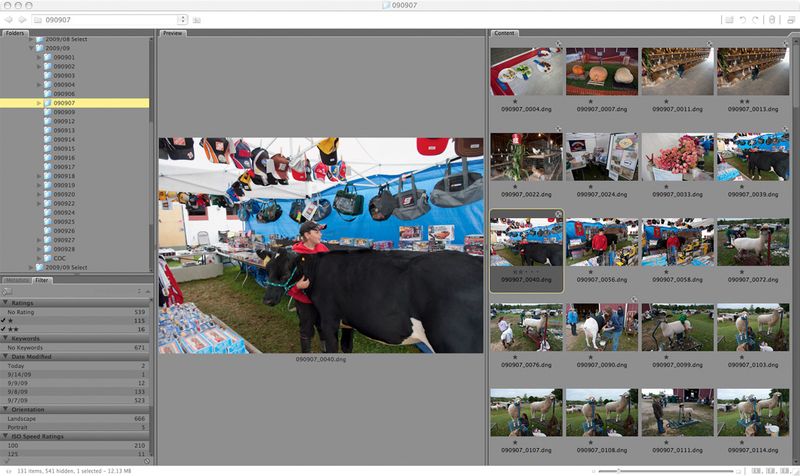
The full take of 671 pictures has been reduced to a much more comprehensible 131. Almost every frame represents a different Situation. By looking at the work Situation after Situation I begin to get a much clearer idea of what I was up to during the shoot. I see my thought process, I can decide which ideas, which trails I was following, were the most productive. Where I still have more than one shot marked from a Situation, it can be helpful to switch from viewing the choices sequentially to a direct comparison, so I select both at once and Bridge displays two good size Previews.
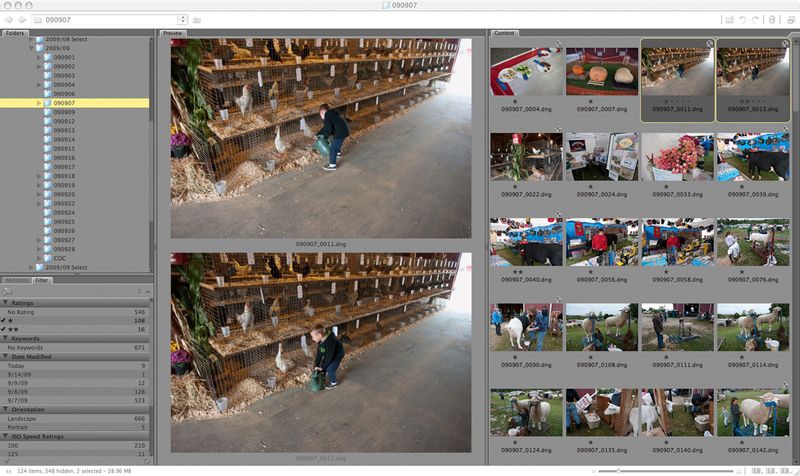
The next step is to start from the beginning again and start putting two-star ratings on the best Situations, then filter again to show only these. Up to now I've just been looking for good pictures, good picture Situations, in a general sort of way. But now it's important to think carefully about intention and audience. My thought about these pictures was that I'd like to use them on one of my blogs, WPII: Pictures in Public. This has a big influence on the next step in the edit. For example, a picture that depends on lots of tiny details won't work in a little 800-pixel wide blog presentation. Another good picture might not fit with the theme of the blog, in which case I might mark it with three stars, indicating "good shot, but not for WPII."
Now it's time start over once again, to work through this much tighter edit of two-star files. At each one, I remove the filtering so I can see all the frames that I shot in each of these best Situations. My initial choice may have been wrong. More important, I now understand the shoot much better from the exercise of finding the best Situations, and that may influence my choice of what is really the most important shot in each. A picture that didn't seem the best before may resonate well with a picture from another Situation, which means it now becomes the better choice if the pictures are to be collected into a group or series like a succession of blog posts. Now is also the time to look for small technical flaws like focus or movement errors. If the picture that seemed best in step one is off focus, but step two told me the Situation was one of the best in the shoot, there may be another frame that gets what I really care about getting from the Situation.
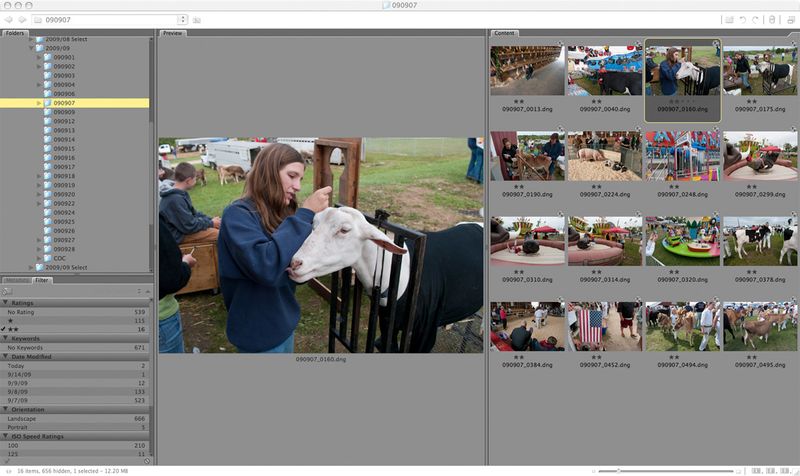
Filtering for the double star files hides everything except the pictures selected to post at the blog. These can be copied to a new folder and run through a batch action to prepare small JPEGs for posting. Bridge also allows you to place color "labels" on individual files. If I had another potential purpose for these pictures, say a brochure promoting the fair, the final tight edit for that could be labeled red. Then filtering for double star would bring up the edit for my blog, filtering for red would bring up the edit for the brochure, even if some pictures appear in both edits. Note that "the pumpkin Situation" in the first screen gab above doesn't make it to this edit—I like the shot but it doesn't fit the theme of WPII.
That's my process, in detail, for editing large groups of captures. But it's the process, not the details, that matters. You can use any file management system and adapt its tools to the purpose. To review, the first step is to slice the take into bite size chunks by dividing the shoot into groups of pictures, then make a tentative pick of the best picture in each group. Then pick the very best of these, or the ones that fit a specific intention or audience you have in mind. Finally, go back and compare each of these survivor pictures with the rest of its shooting Situation and make sure it really is the best choice. Editing a large folder of files can seem like a daunting task, but this process not only cuts the task down to size, it gives us an opportunity to learn about our pictures. Long before the advent of digital capture, David Vestal wrote that one very good reason for photographers to print their own pictures (in the traditional darkroom) was to learn about them. Editing a large take on the computer can also be a valuable learning experience rather than mere drudgery.
Last note—the longer you let this process take, the more time you let pass between shooting and editing, or between the editing steps, the better your edit is likely to be.
Carl
Send this post to a friend
Featured Comment by Ken White: "I recently put together my first large scale (for me) portrait project using a similar multi-pass filtering technique. In my case I started with four years of images in 12 different folders. I went from over a thousand images down to 43 for the final selection. The process of filtering the images and looking at them in great detail helped me see problems and opportunities that will be reflected in my next project. It was a great learning experience."
Featured Comment by Mike in Montreal: "Here's what I do:
1. Pre-shoot checklist.
2. Go to event/interesting location.
3. Shoot at the speed the situation requires. 'Chimp' religiously.
3a. Allow myself to get sidetracked.
4. Sit somewhere. Use camera to edit out junk.
5. Go home. Edit out more sub-grades using camera.
6. Remove card. Load remaining images to a subfolder.
7. Bring into Lightroom using safe all-purpose pre-set.
8. Divide into categories using 'Collections.'
9. Using 'Print' module (with large single-shot template), flip through each collection, assigning the color Yellow to the keepers (based on whatever criteria suits the moment).
10. Filter to Yellow only, develop each image, assigning the color Green when I'm 95–99% satisfied with the result. Not all the Yellows make it this far.
11. Now I look at my Greens as a photo editor would (the print module makes a nice light table) and choose what will best make the story. Mark these as Blue.
12. Final tweaking of the Blues, send to Photoshop.
"I developed this method over time on my own, based on my own quirks and habits. When I read other photogs' workflows, I feel a vague anxiety, so I'm not recommending my approach to anyone here. Mr Weese's tips offer good clues, as do mine, but shooters must find their own way from concept to presentation. Preferably one that keeps the creative process flowing and doesn't throw up psychological obstacles."
by Gary Stochl, from Amazon U.S.
from Amazon U.K. (Note: No "British Penalty" on this one)
